Tracy Iseminger
Add some personalized style to your home with this easy monogram succulent planter!

DIY Monogram Succulent Planter
Items Needed:
- 1- 1×4 Piece of Wood
- Large Thin Wooden Letter
- Measuring Tape
- Pencil
- Tacks (small nails)
- Hammer
- Drill
- 1 ½-Inch Wood Screws
- Kreg Jig (optional)
- 1 ½-Inch Pocket Hole Screws (optional)
- Handsaw or Miter Saw
- Soil
- Succulents
Directions:
Make note that the size of your succulent planter is going to depend on the size of the wooden letter you purchased. You can make your own wooden letter by purchasing some backer board. Use your tape measure and pencil to make straight lines on the board and then use your miter saw or handsaw to cut the letter out.
If you purchased one, your first step is to measure every side of the letter. For example, if you’re using a “T” measure along the top (one piece of wood), measure the side of the cross at the top (this will result in two pieces of wood), and measure the underneath part of the cross at the top (this will also result in two pieces of wood). You will then need to measure down the side of the stem (two pieces of wood) and then measure the bottom of the stem (one piece of wood). You should have 5 measurements total if you’re using this particular letter. If you’re using other letters, you get the idea.
Using the 1×4 piece of wood, measure and cut out all your pieces. If you’re making a “T” you should have 8 pieces of wood total. Your lengths are going to depend on the measurements you made and the wooden letter you purchased. How many pieces of wood you need is going to depend on the letter you chose. For example, the letter “M” will need 10 pieces of wood.
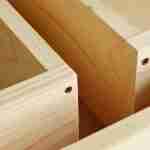


To assemble your pieces of wood, lay your letter down, and put the pieces of wood over the top so that it all connects to make a 3D version of your letter. Simply start screwing one piece together at a time until you letter box is complete. Be sure to stop and lay all the pieces back together randomly while you’re assembling. This will allow you to keep everything lined up with the wooden letter. If you’re slightly off, that’s ok, adding the bottom on will align everything. You can choose to use a kreg jig to make pocket holes if you wish for your screws to be more hidden. You will need to use pocket hole screws in place of your wooden screws if you choose this option.
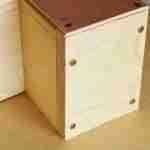
Once your pieces are assembled, flip your letter box and place the wooden letter on top of it. Use your tacks and hammer to attach the letter to your box.

Fill with dirt, add your succulents and you’re set to go. If you would like to do more to your planter by way of decorating. Be sure to sand it down and paint it, stain it, etc. before adding your soil and plants.

Download & Print Directions: DIY Monogram Succulent Planter Instructions